OpenCode+oh-my-opencode环境搭建
前言:在使用 opencode 进行 AI 辅助开发之前,搭建一个稳定、可复用的本地环境是必不可少的一步。本文将围绕 opencode 与 oh-my-opencode 的实际使用场景,记录从依赖准备到完整可用环境的搭建过程,帮助你快速避坑、一次配置长期受用。opencode官网:https:...
2026年1月18日
更新于 2026年1月19日
1.1千字
前言:在使用 opencode 进行 AI 辅助开发之前,搭建一个稳定、可复用的本地环境是必不可少的一步。本文将围绕 opencode 与 oh-my-opencode 的实际使用场景,记录从依赖准备到完整可用环境的搭建过程,帮助你快速避坑、一次配置长期受用。
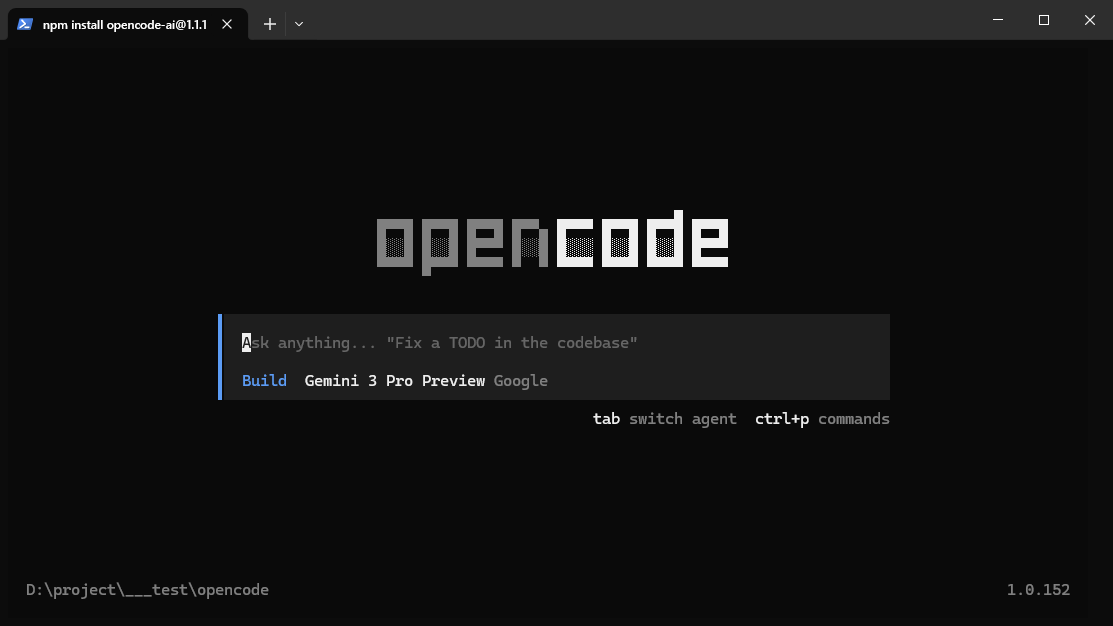
opencode
opencode下载
bash终端打开执行如下命令
curl -fsSL https://opencode.ai/install | bash报错
PS D:\project\___test\opencode> opencode
It seems that your package manager failed to install the right version of the opencode CLI for your platform. You can try manually installing the "opencode-windows-x64" package原因是:opencode 的自动安装脚本没能正确拉取 Windows 对应的二进制包。powershell终端执行如下命令
npm install -g opencode-windows-x64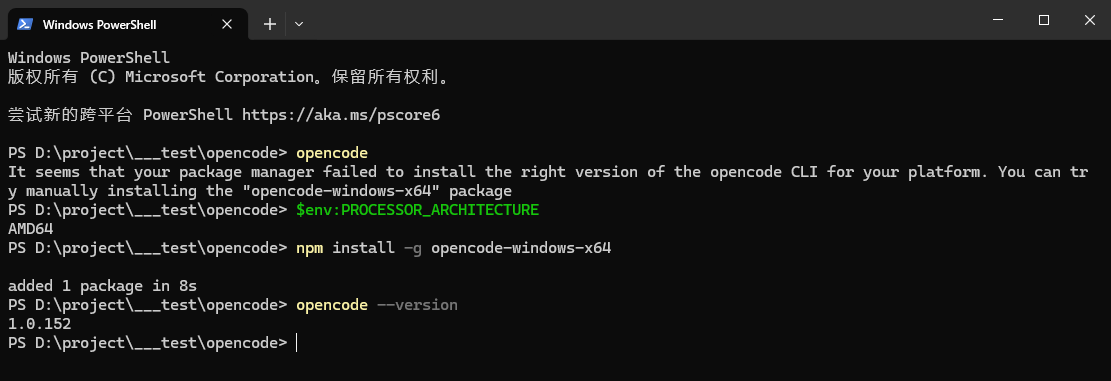
输入opencode出现终端
配置模型提供商
输入/connect

桌面版本交互性更强,建议使用桌面应用,下载地址:https://opencode.ai/download
oh-my-opencode
简单理解就是多AI团队
oh-my-opencode下载:https://github.com/code-yeongyu/oh-my-opencode
中文详细文档:https://github.com/code-yeongyu/oh-my-opencode/blob/dev/README.zh-cn.md
安装bun
powershell -c "irm https://bun.sh/install.ps1 | iex"
新开终端验证

npx oh-my-opencode install按照自己各个订阅状态,交互式输入,类似如下:
PS D:\project\___test\opencode> bun --version
1.3.5
PS D:\project\___test\opencode> npx oh-my-opencode install
┌   oMoMoMoMo...
│
◇  OpenCode 1.0.152 ✓
│
◇  Do you have a Claude Pro/Max subscription?
│  No
│
◇  Do you have a ChatGPT Plus/Pro subscription?
│  Yes
│
◇  Will you integrate Google Gemini?
│  Yes
│
◇  Plugin added to C:\Users\test-user\.config\opencode\opencode.json
│
◇  Auth plugins added to C:\Users\test-user\.config\opencode\opencode.json
│
◇  Provider config added to C:\Users\test-user\.config\opencode\opencode.json
│
◇  Config written to C:\Users\test-user\.config\opencode\oh-my-opencode.json
│
◇  Installation Complete ────────────────────────────╮
│                                                    │
│  Configuration Summary                             │
│                                                    │
│    ○ Claude                                        │
│    ✓ ChatGPT                                       │
│    ✓ Gemini                                        │
│                                                    │
│  ────────────────────────────────────────          │
│                                                    │
│  Agent Configuration                               │
│                                                    │
│    • Sisyphus     → glm-4.7-free                   │
│    • Oracle       → gpt-5.2                        │
│    • Librarian    → glm-4.7-free                   │
│    • Frontend     → antigravity-gemini-3-pro-high  │
│                                                    │
├────────────────────────────────────────────────────╯
│
◇  Next Steps - Authenticate your providers ─────────────────────╮
│                                                                │
│  opencode auth login (select OpenAI → ChatGPT Plus/Pro)        │
│  opencode auth login (select Google → OAuth with Antigravity)  │
│                                                                │
├────────────────────────────────────────────────────────────────╯
│
◆  Installation complete!
│
│  Run opencode to start!
│
◇  🪄 The Magic Word ───────────────────────────────────────────────╮
│                                                                   │
│  Include ultrawork (or ulw) in your prompt.                       │
│  All features work like magic—parallel agents, background tasks,  │
│  deep exploration, and relentless execution until completion.     │
│                                                                   │
├───────────────────────────────────────────────────────────────────╯
│
│  ★ If you found this helpful, consider starring the repo!
│
│    gh repo star code-yeongyu/oh-my-opencode
│
└  oMoMoMoMo... Enjoy!
登录相关登录模型提供商,比如openai
PS D:\project\___test\opencode> opencode auth login
┌ Add credential
│
◇ Select provider
│ OpenAI
[oh-my-opencode] Downloading comment-checker binary...
[oh-my-opencode] comment-checker binary ready.
│
◇ Login method
│ ChatGPT Plus/Pro (Codex Subscription)
│
● Go to: https://auth.openai.com/oauth/authorize?response_type=code&client_id=app_EMxxx_rs
│
● A browser window should open. If it doesn't, copy the URL and open it manually.
│
◇ Login successful
│
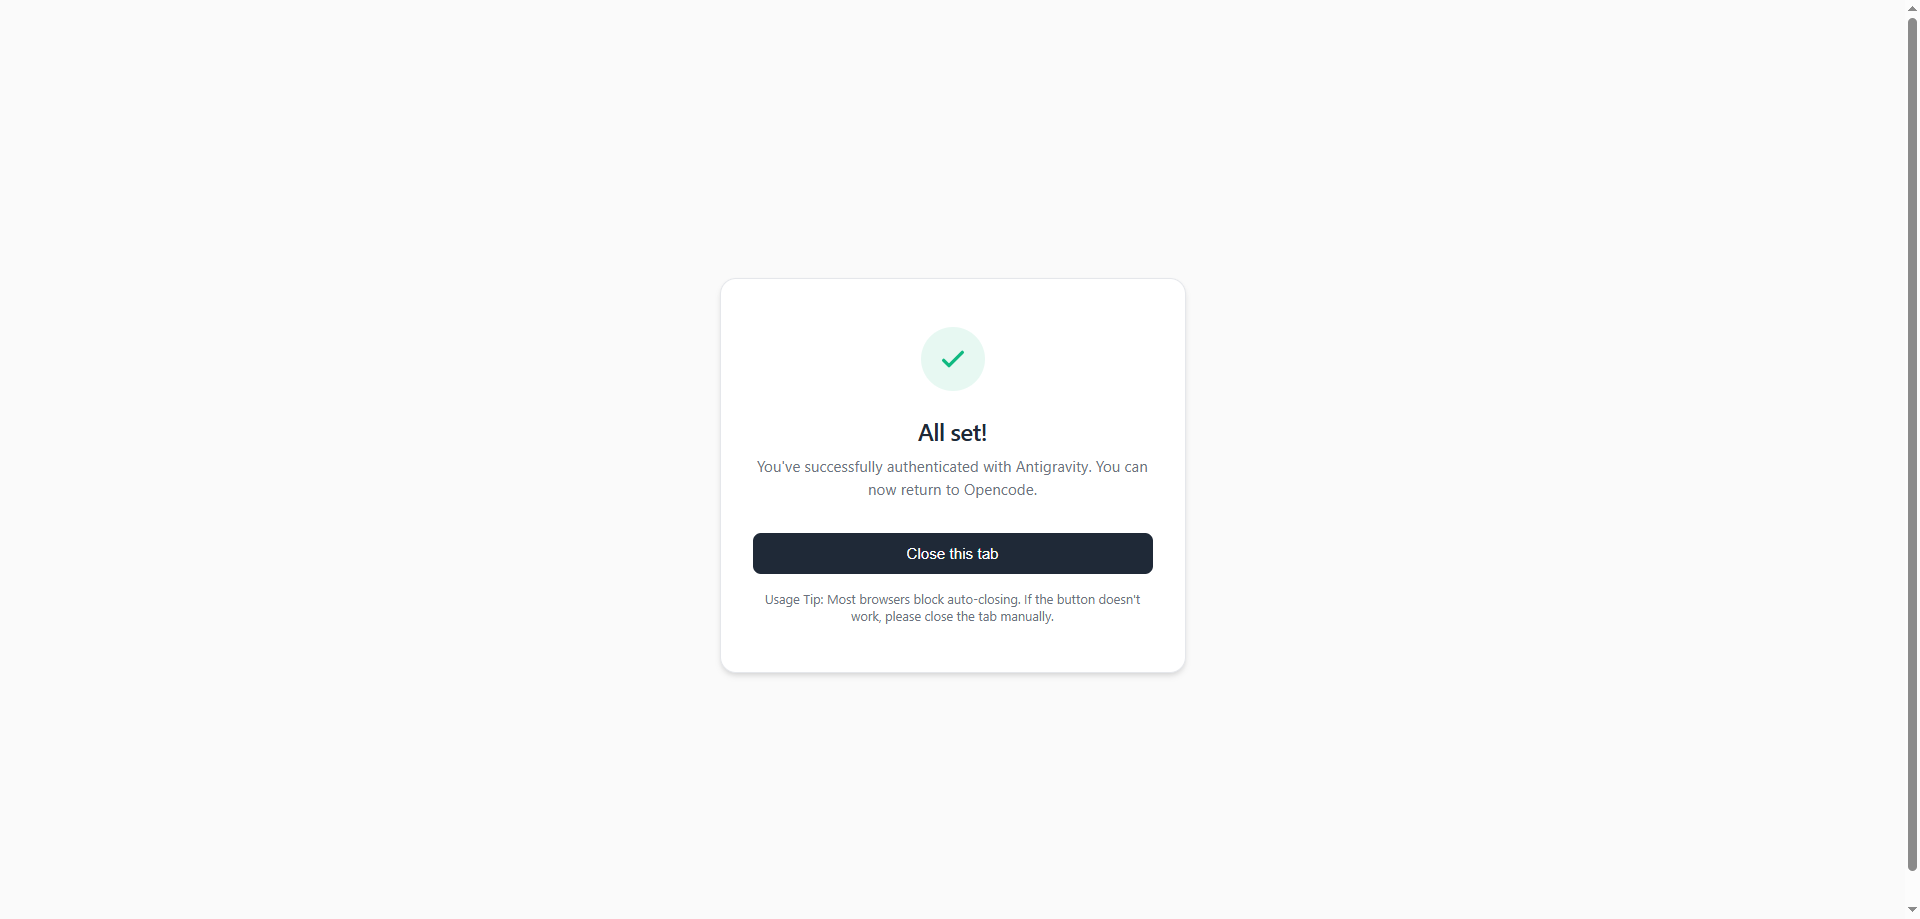
└ Donegoogle auth 登录
PS D:\project\___test\opencode> opencode auth login

┌  Add credential
│
◇  Select provider
│  Google
│
◇  Login method
│  OAuth with Google (Antigravity)

=== Antigravity OAuth (Account 1) ===
Project ID (leave blank to use your default project): project1

OAuth URL:
https://accounts.google.com/o/oauth2/v2/auth?client_id=107100xxxmpt=consent

Add another account? (1 added) (y/n): n
│
●  Multi-account setup complete (1 account(s)).
│
◇  Login successful
│
└  Done
认证成功长这样
修改配置,比如自定义默认模型,在这两个配置文件中可以手动修改相关配置

Usage
- 在项目根路径文件夹中,输入
/init,这是利用opencode来初始化项目生成AGENTS.md文件 - 输入文字前面防止ulw,就会触发多Agent协作,比如:
ulw refactor api module
文章评论区
来过,就留下你的脚印吧~